
Plastic Canvas Doll House - My 4-H Project For The County Fair
Plastic canvas doll house. See step by step how it was built and get tips and other info on working with plastic canvas. Plastic canvas doll house pattern books.

Plastic canvas needlework is a hobby I enjoy. I was first introduced to it by a friend. Every time I visited her, she would have a new set of placemats and coasters on her table. She had a set for every season and holiday. Working with a few of her left overs, I slowly became hooked.
Then it was off to the craft store. I bought design books, needles and lots of yarn. From that, I made many gifts to share with family and friends and for a time, I had enough made up to sell at a craft show.
Then it was off to the craft store. I bought design books, needles and lots of yarn. From that, I made many gifts to share with family and friends and for a time, I had enough made up to sell at a craft show.
Getting A Project Ready For The County Fair
My family was active in 4-H and it was getting time to decide on crafts to enter in the county fair. Not to be left out of the fun, I set out on a project or two of my own to enter in the adult categories. I had already been painting western scenes on cow skulls, so that would be one. Then I wanted to make something western out of plastic canvas.
Shopping around, I couldn't find what I wanted in western patterns, but a doll house caught my eye. I don't remember having a big doll house since I spent more time with horses than with dolls. I bought that pattern, which was more of a book, and had no idea what I had gotten into.
My doll house wasn't complete in time for that years fair, but I entered later.
What Is Plastic Canvas Needlework? -
Plastic canvas needlework requires plastic mesh canvas. The canvas has more weight to it than fabric and is good for making durable flat projects such as coasters. There are are stiff and soft types of plastic canvas used for different projects. The stiff canvas is good for just about any project, but sometimes a soft canvas is needed in order it make projects that have curves. Plastic canvas comes in large rectangle pieces and is the perfect size for a placemat.
Cutting out a pattern piece from the large sheet requires some patience and accuracy since the designs are counted in bars and rows. It is important to the outcome of your project. If you don't won't to go through that, there are some small plastic canvas round and square shapes already cut and perfect size for coasters. Beyond that you will have cut from a sheet size.
Patterns for plastic canvas are on a grid marked with symbols. Each symbol represents the type of stitch to use, the direction the stitch should go and the color of yarn to use. For your project to turn out looking like the picture on the pattern, you have to follow the directions very closely.
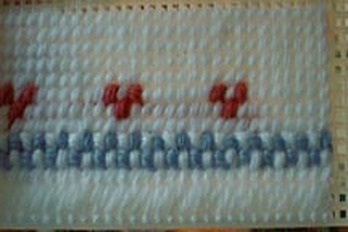
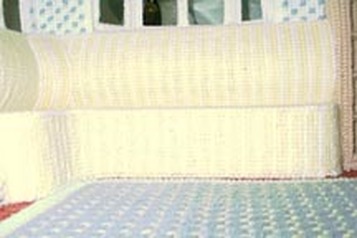
Below is a close up example of some stitches used in my project.
Cutting out a pattern piece from the large sheet requires some patience and accuracy since the designs are counted in bars and rows. It is important to the outcome of your project. If you don't won't to go through that, there are some small plastic canvas round and square shapes already cut and perfect size for coasters. Beyond that you will have cut from a sheet size.
Patterns for plastic canvas are on a grid marked with symbols. Each symbol represents the type of stitch to use, the direction the stitch should go and the color of yarn to use. For your project to turn out looking like the picture on the pattern, you have to follow the directions very closely.
Below is a close up example of some stitches used in my project.
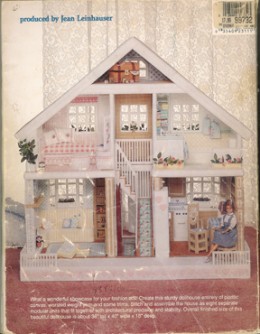
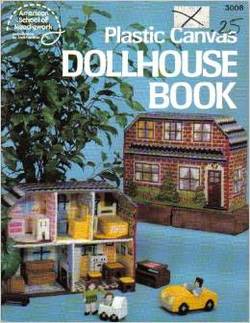
The Plastic Canvas Doll House Pattern Book I Used For My Project.
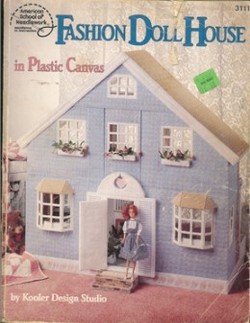
There are still some of these pattern books on the market if you are thinking about building this doll house.
Fashion Doll House in Plastic Canvas Paperback – 1992
Fashion Doll House in Plastic Canvas Paperback – 1992
The Only Plastic Canvas Construction Experience I had Before This Was In Making Kleenex Box Covers
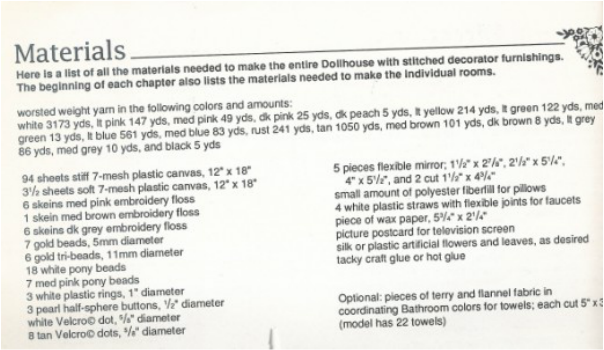
Take a look at the materials list for this doll house. See what all it took to put it together.
See Many Of The Parts And Piece To This Dollhouse
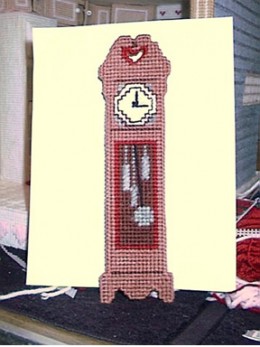
This is the clock for the hallway.
Individual pieces had to be cut and sewn to make an object that would be later sewn into the house.
The Stairs And Floor Before Assembly
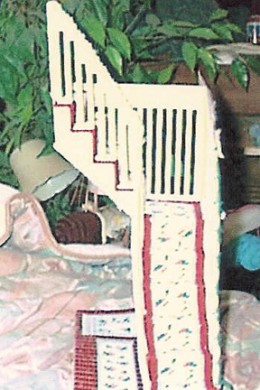
Every part of the doll house had to be made in pieces, then sections that later made up a room. They could only be put in place by having the adjoining piece or section ready. This is part of what gives the house stability.
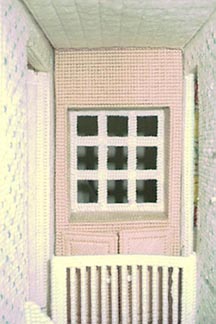
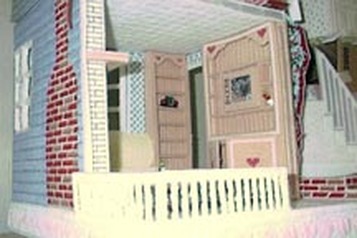
Adding The Front Door To The Stairs And Hall Floor
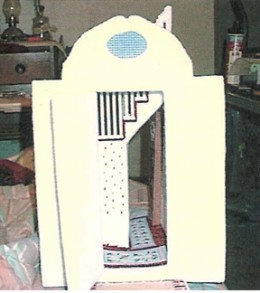
Completed Front Door With Steps Attached To The Outer Wall Side
Tacking Things In Place
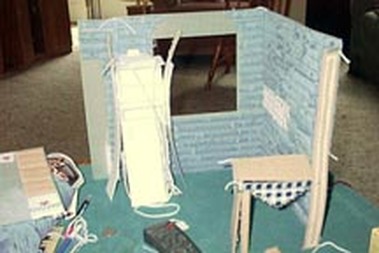
This shows part of the kitchen construction. Sometimes I would use a loose knot to tack things together temporarily. That helped keep some perspective on how all this would come together.
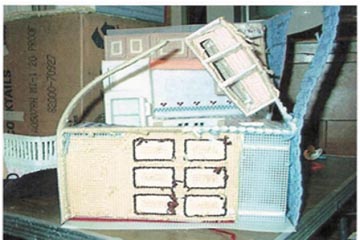
Here you see the wall going up with the "good" side facing out. It was later covered on the inside when the wallpaper, cabinets and appliance piece were completed.
Here you see the wall going up with the "good" side facing out. It was later covered on the inside when the wallpaper, cabinets and appliance piece were completed.
Finishing Out The Kitchen
This is how the outer walls of the kitchen were connected to the cabinets, appliances and then to the floor.
Finished Side of the Kitchen
The china cabinet, table, trash compactor, cabinets, floor and ceiling were all joined. The chair chairs can be moved. I used store bought miniature accessories in some places, like the little bag of groceries and canisters.
Faucets for the kitchen and bathroom sinks were from a piece of flexible drinking straw.
Faucets for the kitchen and bathroom sinks were from a piece of flexible drinking straw.
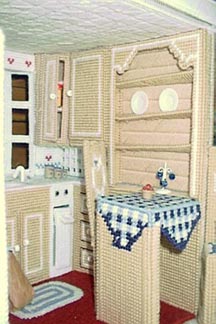
Other Side of Kitchen
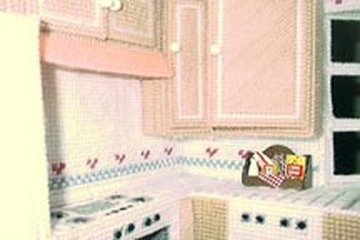
More upper and lower cabinets, the dishwasher and stove with vent hood were added. This is part of where the wall paper ( shown above) was used in the kitchen. Like every other piece, I had to cut it to the required shapes then stitch the design before sewing other pieces or sections in front of it.
The Refrigerator And Open Stove
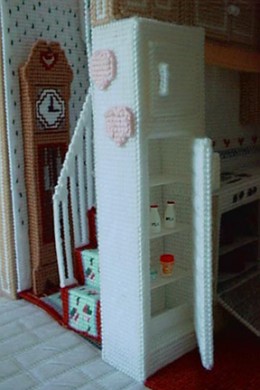
This shows the completed refrigerator and stove doors open. Anywhere in the house where there is a door, cabinet or drawer that would ordinarily open in a real house, they open and close in this doll house also.
The clock (pictured earlier) is shown in it's finished state. It is connected to the wall that was added to the stairway and hall floor, that back up to the stove side of the kitchen.
And it gets bigger.....
The clock (pictured earlier) is shown in it's finished state. It is connected to the wall that was added to the stairway and hall floor, that back up to the stove side of the kitchen.
And it gets bigger.....
Working Out Of Order On A Plastic Canvas Project
I dove into this project not knowing the importance of doing things in an exact order. I just picked the bedroom to start on first That was ok in the beginning until it came time to start connecting things.
I used a box about the size of a room to prop up the bathroom while I finished the kitchen and got it sewn in underneath.
I used a box about the size of a room to prop up the bathroom while I finished the kitchen and got it sewn in underneath.
The Bathroom Tub and Toilet
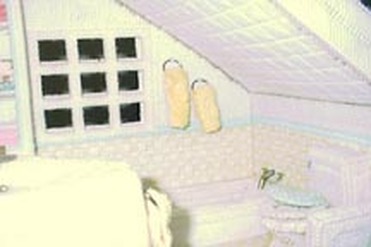
The bath tub is an example of where I used soft plastic canvas. The frame part was stiff, but the soft canvas allowed me to have the curved shape in the tub.
Bathroom Sink Towel Closet And Dirty Clothes Hamper
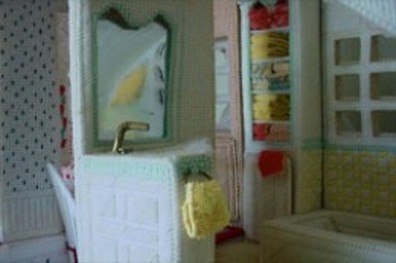
The mirror was cut from a shiny silver placemat and built in behind the wallpaper. I used a flexible drinking straw that I painted gold for this faucet and cut some miniature towels from wash rags to decorate the towel cabinet.
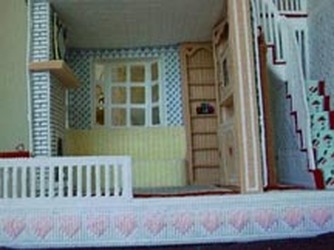
Hall Cabinet and Walk Between Bathroom And Bedroom
Bedroom Bed Wallpaper And Carpet
This was the first room I started with. The wall paper, like in the other rooms, is a design sewn into the wall structure. I used soft plastic canvas to get the rounding on the bed top and pillows
The bed was later sewn to the carpet that I stitched to make the floor structure.
The bed was later sewn to the carpet that I stitched to make the floor structure.
Bedroom Vanity With Seat And Clothes Closet
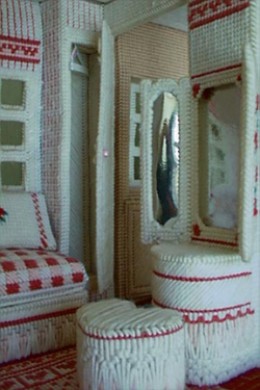
The vanity seat and pillows can be moved in this room. Doors on the three piece mirror can be closed in also.
Bedroom Chest With Drawers That Open

Ceilings in all of the rooms are sewn to the edges that apply. The upstairs rooms are then capped off with the attic and roof piece.
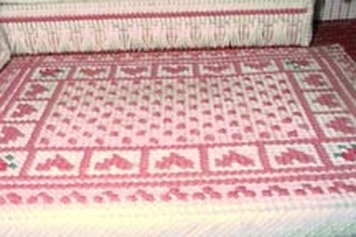
Bedroom Carpet - I think this is what made me start on the bedroom first.
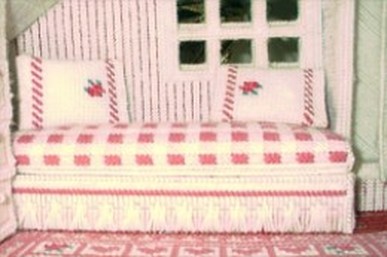
Living Room Sofa Carpet And Wallpaper
The sofa also required soft plastic canvas to make the round back.
Living Room Fire Place - I modified the wall hanging above the mantle to show our cattle brand CR
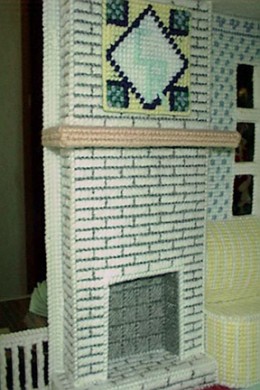
Living Room Corner Showing Outside Wall With Chimney
This picture shows the outer wall with the chimney design sewn in. There is a bookcase and TV cabinet with a TV. I used picture of my son roping a calf for the screen. The picture can be changed since the TV also slides out.
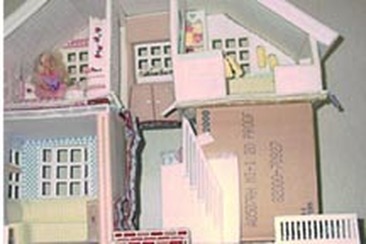
The living room, downstairs hall area and the kitchen sit on the main frame. The main frame shows on the outside to have a porch with rails. The underside is a very sturdy piece of construction that spans the entire length and width of the house. It is built similar to the construction of a regular wooden home with long rows and cross rows for support.
The living room, downstairs hall area and the kitchen sit on the main frame. The main frame shows on the outside to have a porch with rails. The underside is a very sturdy piece of construction that spans the entire length and width of the house. It is built similar to the construction of a regular wooden home with long rows and cross rows for support.
Living Room In Place Next To The Stairs And Hallway
The Roof And Attic Playroom
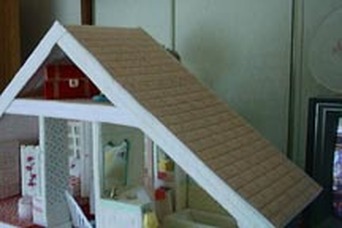
The roof and attic playroom are one big piece. There is a slight lip that fits over the upstairs room celiengs and creates the finished look on the edge.
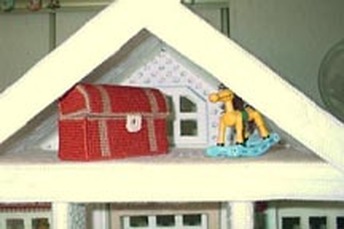
The Attic With Toy Chest - And A Horse For Me
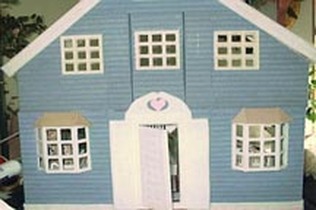
My Finished Doll House From The Front
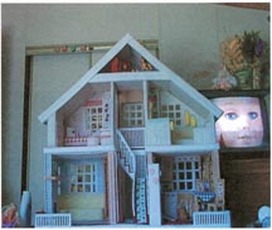
From The Back
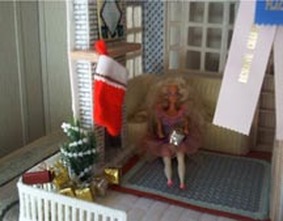
Completed Dollhouse Wins A Ribbon.
That sums up the work on my plastic canvas doll house. A project like this takes a long time to complete and is in no way a starter project. I am proud that I finally finished it. I did show it at a county fair a few years later. It won first place in needlework and Reserve Champion overall in the adult sewing category.
Plastic Canvas Doll House Patterns
There are some other doll house patterns available and some very cute pattern pieces.
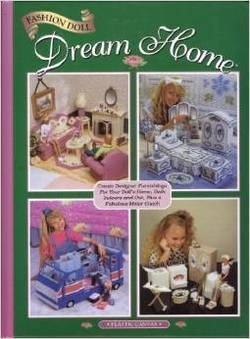
Fashion doll dream home Hardcover – 1996
***Please note ** The title of this pattern book says dream home, but it is not a complete house.
It has lots of cute piece to make to go in a doll house or be used as rooms. There is a living room, bedroom, laundry room, bathroom, patio, camper and camper accessories.
***Please note ** The title of this pattern book says dream home, but it is not a complete house.
It has lots of cute piece to make to go in a doll house or be used as rooms. There is a living room, bedroom, laundry room, bathroom, patio, camper and camper accessories.
I Finally Found The Western Plastic Canvas Patterns I was Looking For - They Were In My Head The Whole Time
With the experience I gained in plastic canvas construction when I built the dollhouse and years of rodeo life, I created my own patterns.
I started out with coasters for the rodeo events. Then I added a tissue box reminding me of arriving at a rodeo to the "Welcome Rodeo Fans" sign on one side and a rodeo clown and bull on the other.
I started out with coasters for the rodeo events. Then I added a tissue box reminding me of arriving at a rodeo to the "Welcome Rodeo Fans" sign on one side and a rodeo clown and bull on the other.
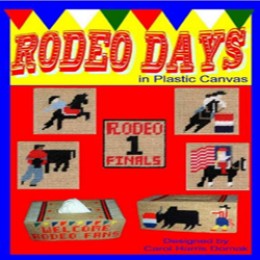
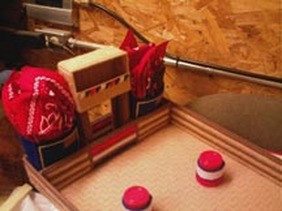
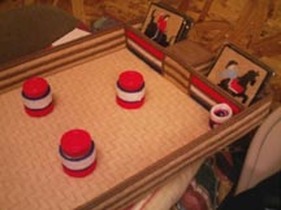
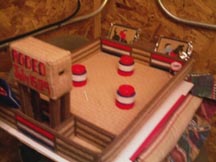
Building A Rodeo Arena
I had such a good time working on the coasters and tissue boxes that I couldn't stop there. I went on to build an entire rodeo arena that can be used as a centerpiece for the table.
The center area of the arena holds placemats. Bucking chutes on the far end hold coasters. It has barrels for barrel racing that are wrapped mini size spice jars. I replaced the spices with salt, pepper and toothpicks. I also made a barrel for the rodeo clown.
|
|
On the announcer stand end of the arena, it does have a raised stand with an alley way for the contestants to come through. There are bucking chutes on either side that to hold the blue jean pocket style napkin and cutlery holders.
With the exception of the bandana napkins, plastic cutlery, and the mini spice jars, this project is entirely made from plastic canvas.
With the exception of the bandana napkins, plastic cutlery, and the mini spice jars, this project is entirely made from plastic canvas.
Free Plastic Canvas Rodeo Patterns
If you would like to see more about the rodeo in plastic canvas or get free printable patterns for some of these pieces, you can go here.
Related Pages

|
|
|
